See also
This manual refers to Codac v1, but a new v2 implementation is currently in progress… an update of this manual will be available soon. See more.
Start a MATLAB project
Tip
Warning
MATLAB specificities
Automating Python to MATLAB conversions
import py.codac.*
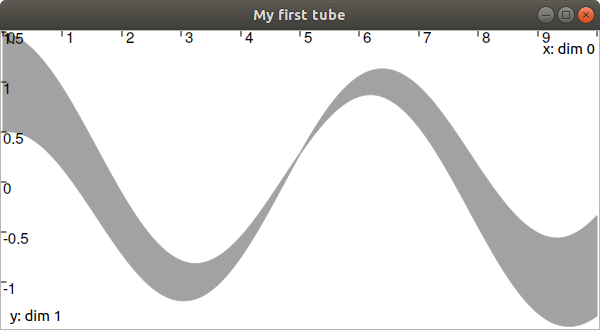
x = Tube(Interval(0,10), 0.01, TFunction("cos(t)+abs(t-5)*[-0.1,0.1]"));
beginDrawing();
fig = VIBesFigTube("My first tube");
fig.add_tube(x, "x");
fig.show();
endDrawing();
In order to visualize the tube, you need to launch before the VIBes viewer independently.
If everything is well installed on your computer, you should see the following window appear:
Warning
Octave support has been only briefly tested on Ubuntu 22.04 for now. Pythonic can be used to be able to call Python code from Octave. Some known necessary adaptations (see also https://wiki.octave.org/Pythonic) are:
Missing import command. https://gist.github.com/lebarsfa/ebc19b143df77753842f920b4b680b84#file-import-m can be loaded in Octave as a workaround. To always load it, try to add its content to ~/.octaverc (e.g. with cat import.m>>~/.octaverc).
In at least Octave v6.4.0 and below, operators such as +, -, *, /, ==, !=, etc. are not overloaded (note that these operators are supported by MATLAB, but some others might not be supported by MATLAB either, see the bottom of https://fr.mathworks.com/help/matlab/matlab_external/differences-between-matlab-python.html). The internal methods __add__(), __sub__(), __neg__(), __mul__(), __truediv__(), __eq__(), __ne__(), etc. can be used instead. A modified version of Pythonic is currently being developed to support these operators (see https://gitlab.com/gnu-octave/octave-pythonic/-/issues/129) and can be installed as follows:
sudo apt install octave liboctave-dev libpython3-dev build-essential make git
git clone https://gitlab.com/gnu-octave/octave-pythonic.git
cd octave-pythonic
git fetch https://gitlab.com/Vipul-Cariappa/octave-pythonic.git operators
git checkout -b octave-pythonic-operators FETCH_HEAD
make
make check
octave --path $PWD/inst --path $PWD/src
Then in Octave:
pkg install .
Then, Codac should be ready to be used in Octave as in MATLAB.